Defense
Shields and repairs
Keep shields pointed at danger, counter incoming threats, and triage damage.
What you do
Section titled “What you do”Defense keeps the ship intact through directional shields, timed countermeasures, and repair triage. Read the threat, move protection to the likely impact facing, then repair the systems that will matter next.
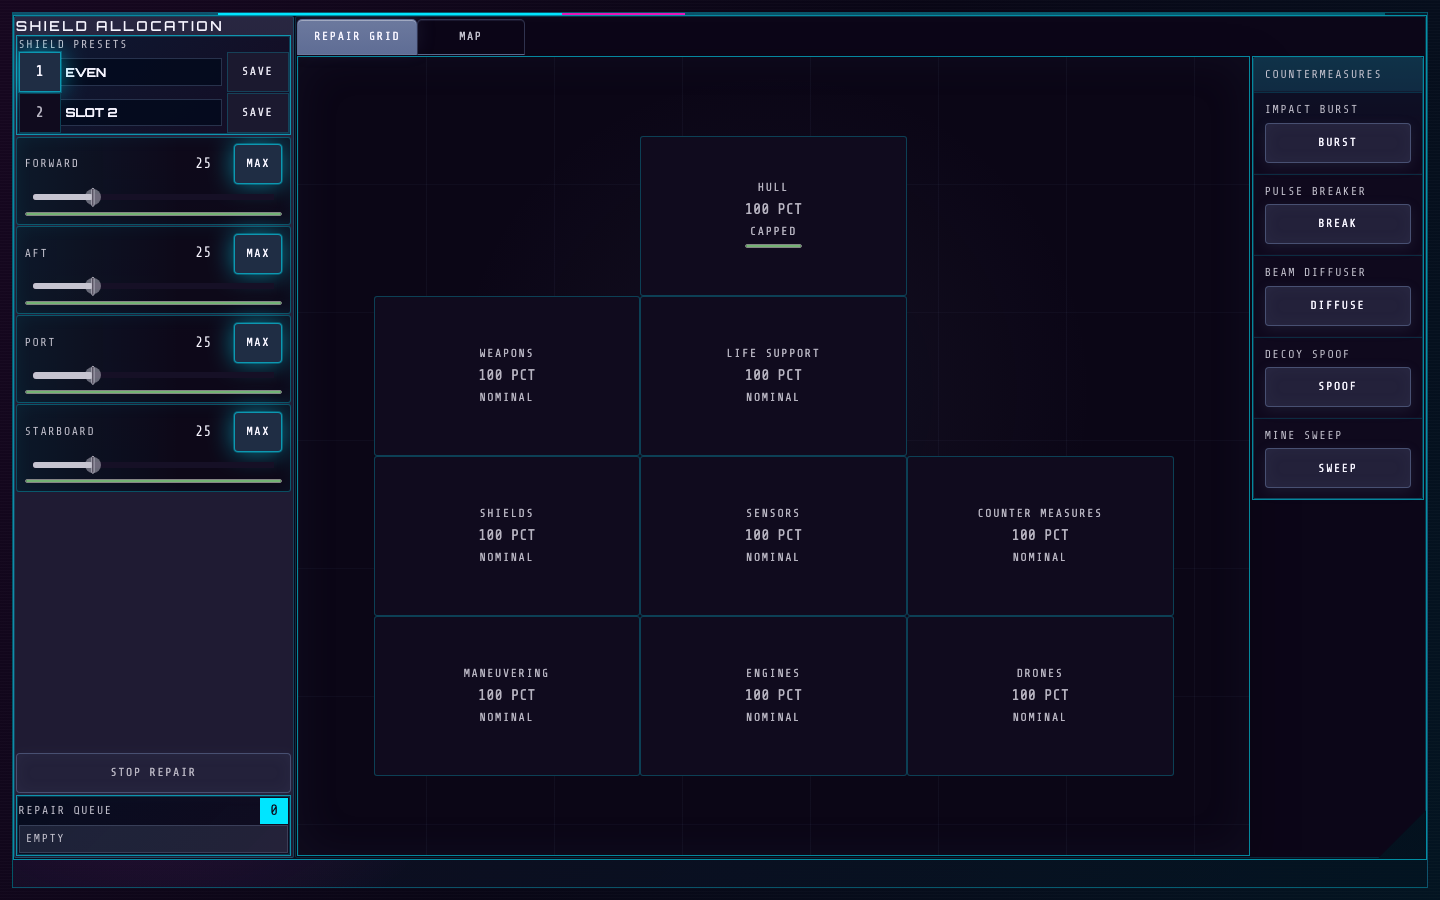
- Facing controls allocate shields to forward, aft, port, and starboard.
- The work area switches between the repair grid and tactical map.
How to control it
Section titled “How to control it”- Drag each facing’s shield slider, or use its Max button, to put protection where a hit is likely. Shield Presets can save and recall useful facing setups when that upgrade is installed.
- Choose damaged areas in the repair grid to start repair work. With Repair Queue installed, Shift-click a second target to queue it behind the active repair. Use the work-area tab or T to switch to the map.
- Trigger the countermeasure matched to a visible threat. Each has a short active window and a cooldown, so timing matters more than pressing every button at once.
| Action | Default key |
|---|---|
| Switch repair grid/map | T |
| Impact burst | A / C |
| Pulse breaker | S / P |
| Beam diffuser | D / B |
| Decoy spoof | F |
| Mine sweep | G / M |
| Max forward shield | Q |
| Max aft shield | W |
| Max port shield | E |
| Max starboard shield | R |
| Load shield preset 1 | 1 |
| Load shield preset 2 | 2 |
| Load shield preset 3 | 3 |
| Load shield preset 4 | 4 |
| Load shield preset 5 | 5 |
Key systems
Section titled “Key systems”Shields protect four directions independently. Damage can also start fires or hurt internal systems; repairing the hull alone will not solve every problem. Countermeasures address different incoming threats: impact, pulse, beam, decoy targeting, and mines. Their controls appear as the matching upgrades are installed.
Upgrades
Section titled “Upgrades”Impact Burst
100 creditsUnlocks a timed burst against immediate collision and impact threats.
Use it: Deploy just before impact; activating too early wastes its active window.
Pulse Breaker
650 creditsUnlocks a countermeasure against incoming pulse fire.
Use it: Identify the pulse threat before spending its cooldown.
Beam Diffuser
800 creditsUnlocks a countermeasure that reduces pressure from beam attacks.
Use it: Use it while a beam threat is active, then rebalance shields afterward.
Decoy Spoof
700 creditsUnlocks a decoy that can disrupt enemy targeting.
Use it: Activate it before a dangerous lock resolves.
Mine Sweep
850 creditsUnlocks a countermeasure that clears nearby mines.
Use it: Watch the tactical map and sweep before the ship enters the mined area.
Repair Queue
700 creditsAllows additional repair targets to wait behind the active repair.
Use it: Queue follow-up damage while the current repair runs, then review the order.
Shield Presets
400 creditsAllows shield-facing allocations to be saved and recalled.
Use it: Prepare a balanced preset and one for a known threat direction.
Useful habits
Section titled “Useful habits”- Read the incoming threat before changing shield facing; a strong shield on the wrong side is little help.
- Let the repair queue handle follow-up work, but interrupt it when a new critical problem appears.
- Save a countermeasure for its matching threat and activate it close to the impact window.
Station challenge: Countermeasure Run
Section titled “Station challenge: Countermeasure Run”The ship travels through a route with mines, pulse and laser turrets, missiles, and direct impact hazards. All five countermeasures are available, and their cooldowns reset immediately in this challenge. A successful deployment earns 10 points once if it affects at least one threat. Damage from scripted threats is stronger than normal. At the far side, the score subtracts rounded missing system integrity; hull damage does not add that score penalty.
Practice goal: identify each threat type quickly, deploy the matching countermeasure in its active window, and preserve the ship’s systems.